

Comparison and bias
Instrument comparison
Check agreement when you run the same test on several analyzers, including a backup or an instrument at another site. Run a set of patient specimens on each analyzer. LabRuns matches specimen IDs, averages repeat readings and checks each analyzer's differences from the reference against your limits.
Your first week is free, with no card needed. See pricing.
Collection plan
- Patient specimens covering the concentration groups you intend to use.
- Every analyzer, with routine QC and calibration checked.
- The documented specimen stability window, and consistent handling.
Suggested starting design: 20 independent specimens, each measured once on every analyzer; 60 results in 60 rows with 3 analyzers.
Choose the count from the precision you need for the mean difference. For example, with a paired-difference SD of about 2 units, 20 specimens give a 95% interval of about ±0.94 units around the mean difference. Plan more for wider scatter or separate concentration groups. Calculated with the NIST mean-interval formula.
Acceptance limits
Set the allowable difference as an amount in the study unit, a percentage of the reference result, or whichever of the two is greater. If your procedure uses different limits at different concentrations, enter them by concentration.
Each analyzer needs at least five paired specimens, with at least 95% of them within their allowance. With fewer than 20 specimens, every one has to be within it.
Report
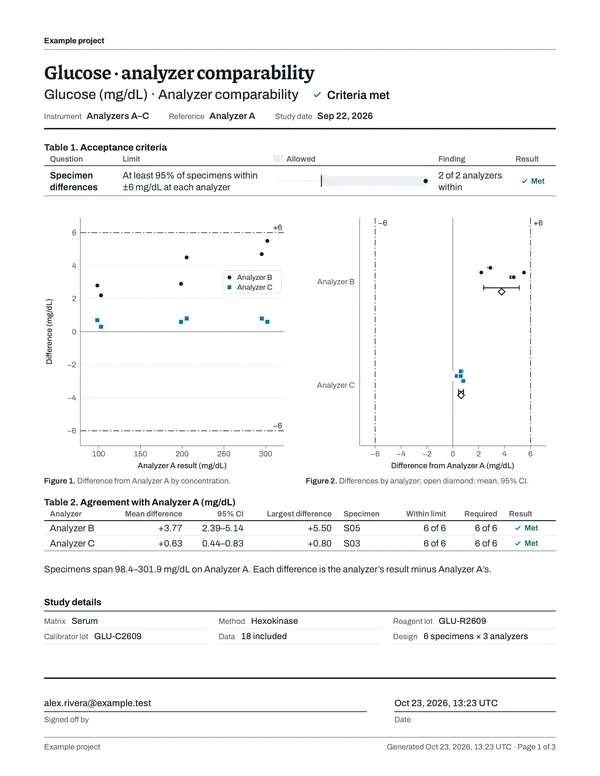
Page 1 shows each analyzer's mean difference from the reference and every specimen's difference against your limits. The matched counts, specimen tables and data listing let you trace each number back to the readings behind it. If you enter a claimed reportable range, the report also shows how much of it your paired specimens covered.
Records
Each saved calculation keeps the data and limits it used. History lists every saved calculation and signed report, each with its own PDF. Prepare an evidence binder with the report versions you choose, grouped by analyte or analyzer, and download the combined PDF and supporting archive.
Recurring work holds your planned comparison dates and links each finished comparison to its study. Keep the instrument list, your specimen handling procedure and any investigation with the rest of your laboratory's records.
Guides
Read the bench guide before you collect, or follow an example study from setup to its signed report.
Run your next instrument comparison.
Start from the suggested collection plan, bring in your analyzer results and sign the report once your laboratory has made its decision.